![iam small logo.png]](https://support.iamcompliant.com/hs-fs/hubfs/iam%20small%20logo.png?height=50&name=iam%20small%20logo.png)
This is a premium feature available with a full subscription to iAM Compliant
iAM Compliant - Entra ID Install Instructions
Introduction
iAM Compliant allows you to configure single sign-on (SSO) functionality so that Microsoft Entra ID (formerly Entra Active Directory) users can be added and managed directly from an Entra ID application. Once the integration between iAM and Entra ID is configured, an administrator can assign new users to the iAM application from Entra ID. User details are then synced automatically between the two systems and the Entra ID users can then log in to their iAM account using their Microsoft work/organisation login.
Once an iAM user is associated with an Entra ID account, it is not possible to update their user details from within the iAM Compliant user administration screen or user profile page. Instead, changes to user details are fed through automatically from Entra ID on a scheduled basis.
This document describes how to configure an iAM account to link with one or more Entra ID accounts.
Prerequisites
- The Single Sign-on feature is only available to iAM Compliant accounts with a full subscription. Contact support to have the feature turned on for your account.
- Your iAM account should be on a plan with sufficient user capacity.
- You should have an Entra ID account with administration access to the Entra ID portal.
- You MUST be familiar with configuring an Entra ID account and managing users within it.
To avoid the creation of duplicate accounts, please check that any existing iAM users in your account have the same details (i.e. email and name) as they do in Entra ID.
Configuration
1. Create a new iAM Compliant app in Entra ID
The first step is to set up a “non-gallery” app in Entra ID for the integration with iAM.
- Log in to the AAD portal enterprise applications page
- Click “New application” > “Create your own application”
- Select the non-gallery option (“Integrate any other application you don't find in the gallery”) and give your application a name. Your users will see this in their My Apps so it makes sense to call it “iAM Compliant” (or “iAM Compliant for [LOCATION NAME]” if you are working with multiple locations).
- Copy the application (client) id and directory (tenant) id values from your new application. To do this:
- Navigate to the AAD App Registrations page and locate your new iAM app (NB may be listed under “All applications”)
- Click on the app and copy the displayed values for “Application (client) ID” and “Directory (tenant) ID”. You will need both these values to set up the SSO configuration in your iAM account (in step 2 below).
- Configure Web Platform
- Whilst still within the App registration page, Click “Authentication” from the left-hand menu
- Click “Add a redirect URI” and select Web
- In the “Redirect URIs” field enter:
https://app.iamcompliant.com/auth/microsoft/callback
- Click “Configure”
- Close the Pop-up window and Click "Settings"

- In the “Front-channel logout URL” field enter:
https://app.iamcompliant.com/logout
- Save your changes
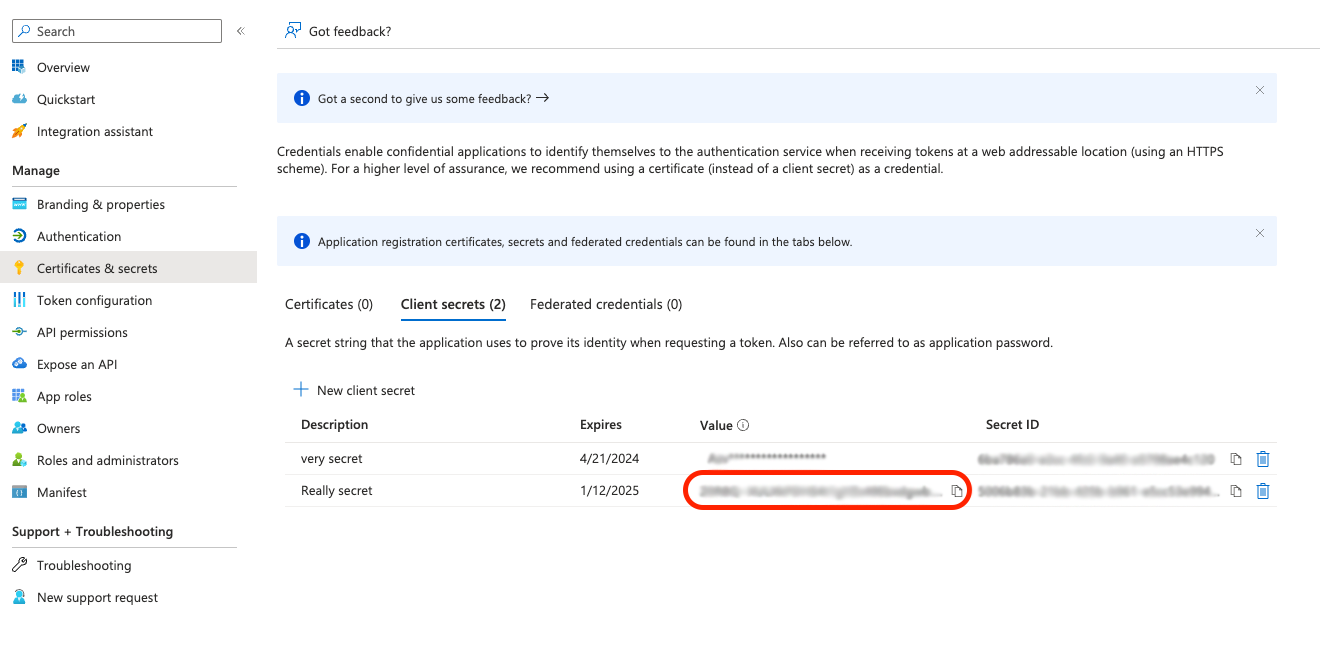
- Create a client secret. To do this:
- Click “Certificates & secrets” from the left-hand menu
- Click “New client secret”
- Enter a description and expiry, then click “Add”
- You should see your new secret, copy the secret “Value” (circled in red below) but don’t share it with anyone. You will need this value to set up the SSO configuration in your iAM account.
- Add application logo (optional). Adding a logo to your app is useful as it appears on the My Apps tile along with the app name entered in 1.3. To add a logo:
- Click “Branding & properties” from the left-hand menu
- Select a file to for the “Upload new logo” field and save your changes
- An iAM Compliant logo is available here:
/AzureSSO/iAM%20Compliant%20logo%20215.png)
Once you’ve created an Entra ID app and copied the client id, client secret and tenant id values you are ready to configure the iAM Compliant part of the integration.
2. Create an SSO configuration
This step sets up a configuration that enables iAM to recognise your users both when they sign in using single sign-on and when they are submitted to iAM from Entra provisioning. First log in to your iAM account as an account administrator and go to the account settings for your organisation.
- Within your iAM Account, go to your Settings and click the “Single Sign-on” link in the right-hand sub-menu.
- To create a new configuration click the Add Config button
- Enter a display name for your configuration. Only account owners will see this name but it makes sense to call it something that relates to your Entra app (e.g. “Entra SSO” or “Entra SSO for [LOCATION NAME]” if you are working with multiple locations).
- Enter the values copied from your Entra app (
1.4.a & 1.4.b above) for “Application (client) ID”, “Directory (tenant) ID” and “Client secret”
- If you have more than one location in your iAM organisation, you can also select which locations your SSO users should be granted access to. Users added to iAM from your Entra app will be given access to the locations you select here. If you prefer, you can choose not to assign your users to any location automatically; instead you will need to manually assign their location(s) after they have been added to you iAM account by the provisioning process.
-png.png)
With email domains configured, only users provisioned with matching email domains will be assigned to a location. This can be used to assign specific sets of users to multiple locations.
-png.png)
For more information see the section on Multiple SSO Integrations below in Step 9.
If your iAM organisation only has one location you can ignore this step - you will not see any options for applicable locations here.
4. Finally save the new configuration.
3. Copy User Token & Login URL
Once you have successfully added a single sign-on configuration, you should see a summary of your new configuration. There are two fields to copy which will be used below to finish the Entra ID setup.
- User provisioning token
This token should only be used to configure the user provisioning section of your Entra ID app. You can view and copy this token but please ensure that you keep it secure. - OAuth URL
This value is used to configure the Entra single sign-on in step 5 below.
4. Configure User Provisioning
This step configures your Entra ID app so that it automatically creates and updates your iAM users.
- Admin Credentials
- Go back to your Entra ID enterprise applications and select the app you created.
- Select “Provisioning” from the menu. Then click “New Configuration”
- In the “Tenant URL” field enter
https://app.iamcompliant.com/api/scim_v2/
- In the Secret Token enter your user provisioning token copied in step 3 above.
- Recommended: You can use the Test Connection button to verify that a connection is made to the iAM server. This will only work if your provisioning token is valid.
- If the connection is OK, save your provisioning config by clicking "Create".
- Mappings. Next you will need to click "Provisioning" again from the left-hand tabs.
- Configure user mapping. For single sign-on to work, iAM needs to be provided with five attributes for each user:
Attribute
Comment
SSO external id
Not visible, used when signing in from a Microsoft account
Email address
Always unique in iAM
First name
Last name
Active
Turns the iAM user account on/off
- To set up these mappings:
- Open the "Mappings" dropdown
- Click “Provision Microsoft Entra Users”
- Set Enabled to “Yes”
- A typical mapping should look like this:
-1.png?width=688&height=270&name=image%20(1)-1.png)
- Save and confirm
- If you cannot see objectId in your mappings click Add New Mapping and add the following details:
- Mapping type: Direct
- Default value: Leave as empty
- Source Attribute: ObjectId
- Target attribute: ExternalId
- Match objects using this attribute: Yes
- Matching precedence: 2
- Apply this mapping: Always
- Click "OK" & then click "Save"
- Disable group provisioning. Provisioning iAM groups through Entra is not currently supported so that part of the provisioning should be turned off to avoid errors.
- Navigate back to your Mappings area
- Click “Provision Entra ID Groups”
- Set Enabled to “No”
- Save and confirm
- Set Provisioning Status
Setting the “Provisioning Status” box to “On” will make the automated Entra user provisioning cycle start. You can leave this for later or alternatively start or stop provisioning from the main provisioning screen.
- Configure user mapping. For single sign-on to work, iAM needs to be provided with five attributes for each user:
5. Configure Single Sign-on
The single sign-on integration needs to use a custom login URL in order to tell iAM which client is accessing the system. To set this up:
- Go back to your Entra ID enterprise applications and select the app you created.
- Select “Single sign-on” from the menu
- Select “Linked” as the single sign-on method
- Enter the login URL value copied from your iAM SSO config in 3.2 as the “OAuth URL” value and save the changes.
6. Assign Users
Once the user provisioning mapping is set up it’s necessary to assign the iAM Compliant app to any of your Entra ID users who should be granted access to your iAM Compliant account.
We recommend starting with one or two accounts first to ensure users are being created and updated correctly, and to test that single sign-on is working as expected.
- Select “Users and groups” from the menu.
- Click “Add user/group”, then in the Users area click the “None/Selected” link to open a user selection interface.
- Select one or more users to assign to the app.
- Click “Assign” to save your changes.
If you already have users with access to iAM Compliant their accounts will still work as before (with their existing passwords if they choose to login with a standard password login). Single sign-on is appended to their iAM user and they will also be able to login in by clicking the iAM Compliant tile in My Apps; this will initiate the single sign-on flow and not require an iAM password. Existing users will retain their existing iAM role.
New users added to iAM via Entra ID provisioning will not automatically receive an iAM password. They should just use the My Apps login. New users will be assigned a “Reporter” role in iAM Compliant. Their role can be updated by another iAM user with sufficient user management privileges.
Once an iAM user is synced with an Entra ID account, the user details for that account will no longer be editable within iAM:
/AzureSSO/Azure%20SSO%20user%20profile.jpg?width=624&height=295&name=Azure%20SSO%20user%20profile.jpg)
7.. Start Provisioning
Use the Provisioning menu in your Entra ID enterprise app to start and stop automated provisioning and to view logs and error messages. You can also provision users individually which can be useful for verifying that everything’s working as expected.
Refer to the Microsoft documentation for more information about user provisioning. Be aware that there is a delay of as much as 40 minutes for changes to sync automatically between Entra ID and an iAM account.
Once users have been provisioned successfully, the Entra ID logs will record success messages. Account administrators can view and filter SSO-enabled users inside their iAM account user settings:
/AzureSSO/Filtered%20Azure%20SSO%20user%20list.jpg?width=624&height=568&name=Filtered%20Azure%20SSO%20user%20list.jpg)
8. Grant Permissions
When first logging in using single sign-on users are presented with a consent screen asking them to allow the app to read their basic user profile. To eliminate this step an Entra user with owner privileges can accept these permissions on behalf of all users you assign the app to.
To do this simply log in to iAM from My Apps and you should see a screen like this:
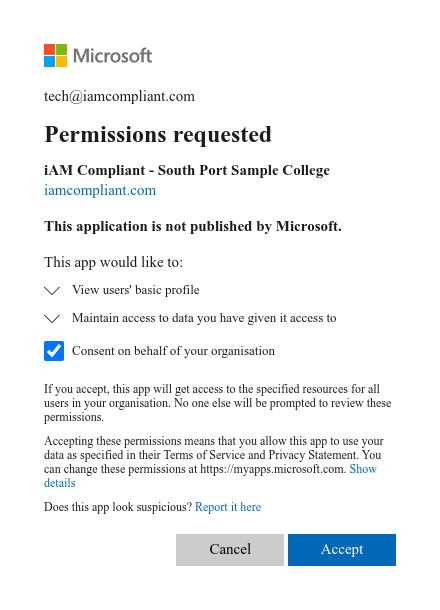
Ensure the “Consent on behalf of your organisation” box is checked and then Accept. If you don’t see the box, check you are assigned as the owner of your Entra app by going to your enterprise application and navigation to the “Owners” menu item.
9. Multiple SSO Integrations
Steps 1 to 8 of this guide can be repeated for a single iAM account to support a number of scenarios:
- An iAM account with multiple locations where users need to be provisioned with different location access
- An Entra ID account with multiple directories
- An organisation with multiple Entra ID accounts
For any of these cases, repeating steps 1 to 8 of this guide will add multiple SSO configurations to your iAM account. If your iAM account has more than one location, pay particular attention to section 2.3 as setting applicable locations can be used to manage user access across multiple locations.